
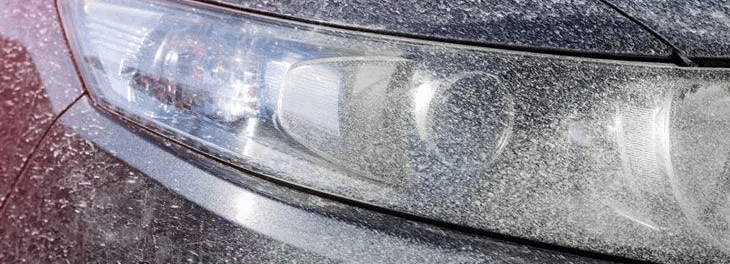
Headlights are an essential part of any car. They are responsible for providing visibility during nighttime driving and inclement weather conditions. Over time, however, headlights can become foggy and yellow, making it difficult to see while driving. This can not only be frustrating but also dangerous.

Restoring your headlights can save you from the cost of replacement, but it’s not always an easy task. In this article, we will discuss how to restore your headlights permanently.
What Causes Headlights to Become Faded and Yellow?
Before we dive into how to restore headlights, it’s important to understand what causes headlights to become faded and yellow in the first place. The main culprits are exposure to the sun’s UV rays and oxidation. The plastic covering over the headlights is porous, which makes it susceptible to damage from these environmental factors. Additionally, dirt, debris, and road grime can accumulate on the surface of the headlights, further contributing to their deterioration.
Steps to Restoring Headlights
Restoring your headlights doesn’t have to be a daunting task, and it can be done relatively quickly and easily with the right tools and techniques. Here are the steps you need to take to restore your headlights permanently:
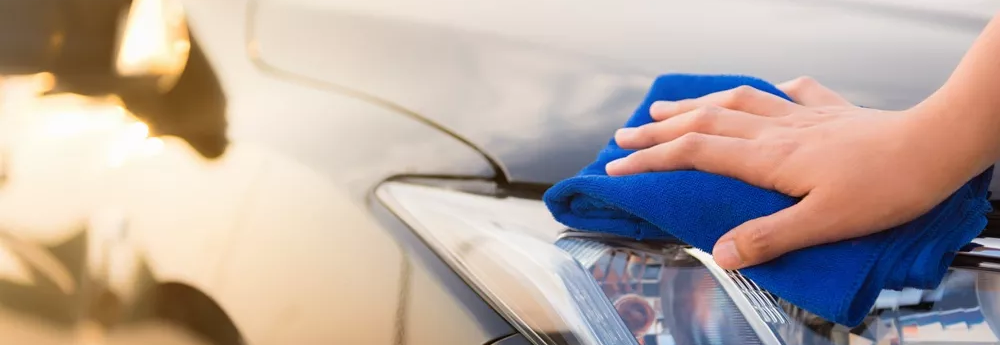
# Step 1: Cleaning Headlights
The first step in restoring headlights is to clean them thoroughly. Use soap and water to remove any dirt and debris from the surface of the headlights. Be sure to dry the headlights completely before moving on to the next step.
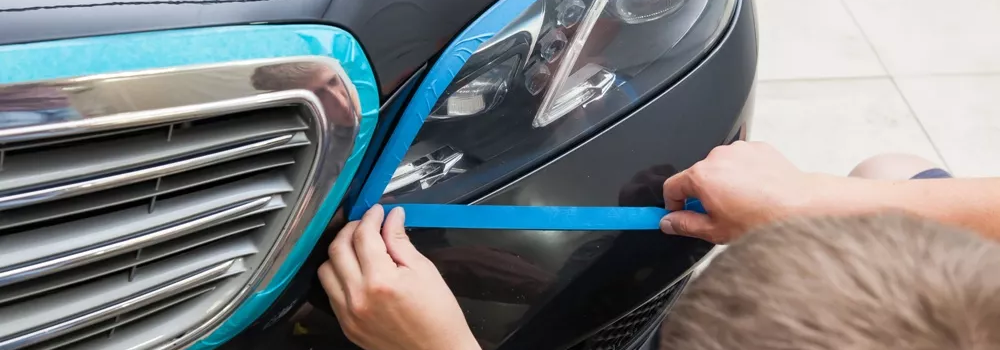
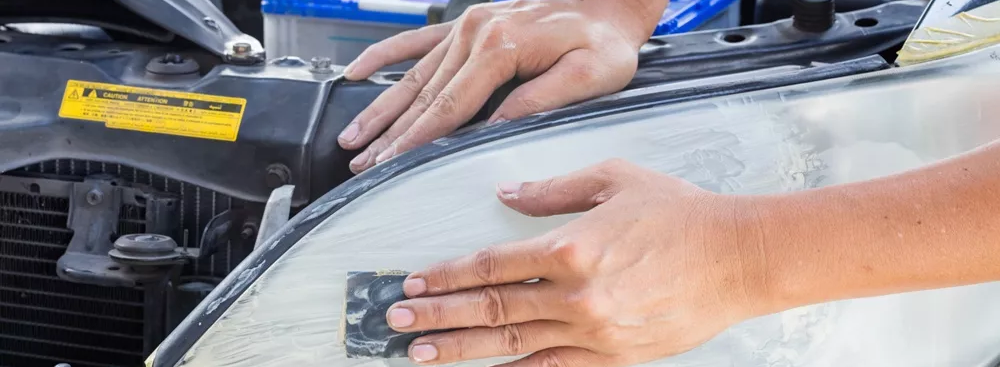
# Step 2: Sanding Headlights
Notice: Mask the area around them with masking tape to protect it from the sandpaper.
Sanding is the most critical step in the restoration process. It involves removing the top layer of the plastic covering to reveal a new, clean layer underneath. There are two methods of sanding that can be used for this process – wet sanding and dry sanding.
Dry sanding is the more traditional method of sanding, but it can be more difficult to get a smooth finish. Start by using a sanding block with 600-grit sandpaper to sand the surface of the headlights in a horizontal motion. It’s important to keep the sanding block flat on the surface to avoid creating any low spots or high spots. After sanding with the 600-grit sandpaper, repeat the process with 1500-grit sandpaper. Finally, use 2000-grit sandpaper to give the headlights a smooth finish.
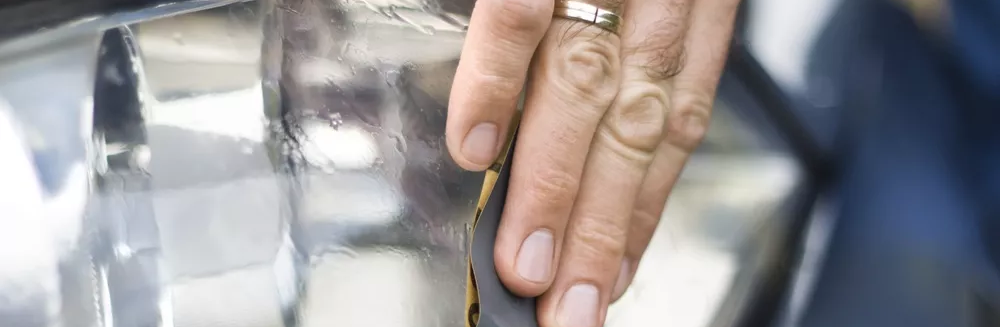
Wet sanding is the preferred method of sanding for many professionals because it provides a smoother finish. The wet sanding process is similar to dry sanding, but you will need to use a lubricant such as water or soapy water. Wet sanding can also be done by hand or with a sanding machine.
Start by using 800-grit sandpaper with a sanding block, and wet the surface with the lubricant. Sand in a horizontal motion, keeping the sanding block flat on the surface. After sanding with the 800-grit sandpaper, repeat the process with 1500-grit sandpaper. Finally, use 2000-grit sandpaper to give the headlights a smooth finish.
# Step 3: Polishing Headlights
After sanding, it’s time to polish the headlights to restore their shine. You can use a polishing compound or a headlight restoration kit for this process. Apply the polishing compound or kit as directed and use a clean cloth to buff the surface of the headlights in a circular motion. Continue to buff until you achieve the desired shine.
# Step 4: Apply a UV Coating
To prevent the headlights from fading and yellowing again, it’s important to apply a UV coating. This coating will help to protect the headlights from the sun’s harmful UV rays and other environmental factors that can cause damage. There are many different types of UV coatings available, including sprays, wipes, and liquids. Follow the instructions on the coating you choose to apply it correctly.

Tips for Successful Headlight Restoration
Now that you know the steps involved in restoring your headlights, here are some tips to help you achieve the best results:
- Use the Right Sandpaper Grit:Choosing the right grit of sandpaper is crucial in achieving a successful restoration. Using a grit that is too rough can cause damage, while using a grit that is too fine will not effectively remove the damaged layer of plastic. 600-grit sandpaper is a good starting point for dry sanding, while 800-grit sandpaper is recommended for wet sanding.
- Keep the Surface Wet:When wet sanding, it’s important to keep the surface wet with water or a lubricant. This helps to prevent the sandpaper from clogging and produces a smoother finish.
- Use a Sanding Block:A sanding block can help to keep the sandpaper flat on the surface, preventing low spots or high spots from forming. This will ensure that the surface is smooth and even.
- Don’t Rush: Take your time when sanding and polishing the headlights. Rushing can cause mistakes and result in a less than satisfactory outcome.
- Protect the Surrounding Area: When sanding and polishing the headlights, be sure to protect the surrounding area of the car with tape or plastic to prevent accidental damage.
How to maintain your headlights?
Maintaining your restored headlights is essential to ensure that they continue to look clear and bright for a long time. Here are some tips to help you maintain your headlights:
- Regular Cleaning: Make sure to clean your headlights regularly with soap and water to remove any dirt or grime that may accumulate on the surface. Avoid using abrasive cleaners or rough materials that can scratch the surface of the headlight.
- Waxing: Apply a coat of wax to your headlights after cleaning them to help protect them from the elements. Waxing will help to keep the headlights clear and shiny for a longer time.
- Protective Coating: Reapply a protective coating every few months to maintain the clarity and brightness of the headlights. Follow the manufacturer’s instructions for the application of the coating.
- Avoid Harsh Chemicals:Avoid using harsh chemicals or solvents on your headlights, as they can damage the surface of the headlight and cause hazing.
- Park in Shade:Whenever possible, park your car in a shaded area to prevent the headlights from being exposed to direct sunlight for extended periods. UV rays from the sun can cause hazing and discoloration of the headlights.
Conclusion
Restoring your headlights can be a DIY project that can save you a lot of money compared to buying new headlights or taking your car to a professional detailer. With the right tools and techniques, you can remove the oxidized layer from your headlights and restore them to their original clarity. Just remember to take your time, use the correct grit of sandpaper, and be patient throughout the process. With a little elbow grease, you can have your headlights looking as good as new in no time!