
Bowling is an enjoyable sport that requires skill, precision, and the right equipment to get the perfect shot. One of the most crucial pieces of equipment for a bowler is the bowling ball. Over time, bowling balls can become worn and lose their original surface, which can affect their performance. If you’re a regular bowler and you’ve noticed that your ball isn’t performing as well as it used to, it might be time to get it resurfaced. In this article, we’ll take a look at how to resurface a bowling ball.
Is it necessary to resurface a bowling ball?
Before we dive into the specifics of how to resurface a bowling ball, let’s take a quick look at why you might need to do it. Over time, the surface of a bowling ball can become worn down, scratched, or otherwise damaged. This can lead to a decrease in the ball’s performance, including a loss of hook potential, a reduction in ball speed, and a decrease in overall accuracy. Resurfacing a bowling ball can help restore its original surface and improve its performance on the lanes.
What you’ll need
Before you begin the resurfacing process, you’ll need to gather a few supplies. Here’s what you’ll need:
A sanding disc – You can find sanding discs in a variety of grits. The grit you choose will depend on the condition of your bowling ball. For minor surface imperfections, a fine-grit sanding disc (400-600 grit) will be sufficient. For more severe damage, you may need a coarser grit (200-300 grit).
A bowling ball spinner – A bowling ball spinner is a device that rotates the ball while you work on it. You can find these devices at most bowling pro shops.
Cleaning solution – You’ll need a cleaning solution to clean the ball before and after the resurfacing process. Some bowling pro shops sell specialized cleaning solutions for bowling balls, but you can also use a mixture of warm water and mild dish soap.
Microfiber towel – You’ll need a soft, lint-free towel to dry the ball after cleaning.
Masking tape – You’ll need masking tape to cover any holes in the ball to prevent debris from getting inside.
Bowling ball plug – If your ball has deep scratches or gouges that can’t be fixed with a sanding disc, you may need to use a bowling ball plug to fill in the imperfections.
The resurfacing process
Now that you have all the necessary supplies, it’s time to get started on the resurfacing process. Here are the steps you’ll need to follow:
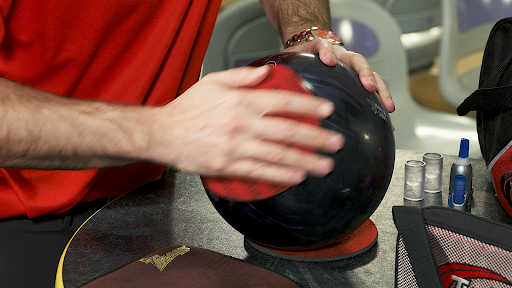
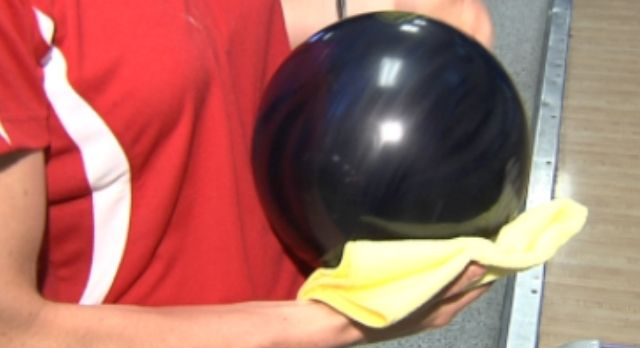
- Clean the ball– Begin by cleaning the ball with a cleaning solution and microfiber towel. Make sure you remove any dirt, oil, or other debris from the ball’s surface. Let the ball dry completely before moving on to the next step.
- Cover the holes– Use masking tape to cover any holes in the ball, such as the finger holes or thumb hole. This will prevent debris from getting inside the ball while you work on it.
- Select the sanding disc– Choose a sanding disc with the appropriate grit for your bowling ball‘s condition. As mentioned earlier, finer grits are suitable for minor surface imperfections, while coarser grits are better for deeper scratches and gouges.
- Mount the ball on the spinner– Place the ball on the spinner, making sure it’s securely mounted. The ball should be centered on the spinner to ensure an even sanding.
- Apply the sanding disc– Turn on the spinner and apply the sanding disc to the ball’s surface. Use light pressure and make sure to keep the sanding disc moving in a circular motion around the ball. Be sure to cover the entire surface of the ball, including the finger holes and thumb hole if they are not covered by masking tape. The sanding disc will remove the outer layer of the ball’s surface, creating a fresh surface that will improve the ball’s performance.
- Check the progress– Periodically stop the spinner and check the progress of the resurfacing. You should see a noticeable improvement in the ball’s surface. If you’re using a coarse-grit sanding disc, you may need to make several passes over the ball to achieve the desired level of smoothness.
- Clean the ball again– Once you’re satisfied with the level of resurfacing, clean the ball again with the cleaning solution and microfiber towel. Make sure to remove any debris or dust from the ball’s surface.
- Remove the masking tape– Remove the masking tape from the holes in the ball.
- Test the ball– Take the ball out for a few practice shots to see how it performs. You should notice an improvement in the ball’s hook potential, speed, and accuracy.
Optional step: Filling in deep scratches or gouges
If your ball has deep scratches or gouges that can’t be fixed with a sanding disc, you may need to use a bowling ball plug to fill in the imperfections. Here’s how to do it:
Clean the ball – Clean the ball with the cleaning solution and microfiber towel.
Apply the plug – Mix the bowling ball plug according to the manufacturer’s instructions. Apply the plug to the damaged area, making sure to fill in the entire scratch or gouge. Smooth out the surface of the plug with a spatula or other tool.
Let the plug dry – Let the plug dry completely before moving on to the next step. This may take several hours or overnight.
Sand the plug – Once the plug is dry, use a sanding disc to sand the surface of the plug until it’s smooth and level with the rest of the ball’s surface.
Resurface the ball – Follow the steps outlined above to resurface the ball, starting with cleaning the ball and covering the holes with masking tape.
Conclusion
Resurfacing a bowling ball can help restore its original surface and improve its performance on the lanes, so it is vital to master how to resurface a bowling ball. With the right supplies and a little bit of know-how, you can easily resurface bowling ball using a sanding disc. Remember to choose the appropriate grit for your ball’s condition, cover the holes with masking tape, and check your progress periodically. With a freshly resurfaced ball, you’ll be back to your winning ways on the lanes in no time!