
When it comes to welding, one of the most important steps in the process is prepping the metal. Prepping the metal involves removing any contaminants and ensuring that the surface is clean and ready for welding. Properly prepping the metal can greatly improve the quality of the weld and prevent issues such as porosity, cracking, and weld failure. In this article, we will discuss the steps and strategies for proper weld preparation .
Steps To Proper Weld Preparation
Step 1: Remove Any Contaminants
The first step in prepping metal for welding is to remove any contaminants on the surface of the metal. This includes rust, paint, oil, and any other debris that may be present. Failure to remove these contaminants can result in poor weld quality and can even cause the weld to fail. One of the most effective ways is using grinding wheel or using wire brush to remove contaminants. These tools can be used to remove rust, paint, and other debris from the surface of the metal. It is important to wear proper personal protective equipment (PPE), including eye protection and gloves, when using these tools.
Step 2: Clean the Surface
Once any contaminants have been removed, it is important to clean the surface of the metal. This can be done using a solvent such as acetone or alcohol. The solvent should be applied to a clean cloth and used to wipe down the surface of the metal. This will help to remove any remaining contaminants and ensure that the surface is clean and ready for welding. It is important to allow the solvent to fully evaporate before welding to avoid any potential issues.
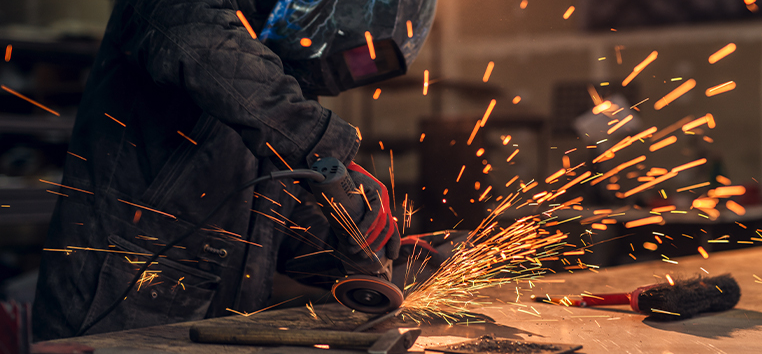
Step 3: Use a Cutting Wheel
If the metal needs to be cut prior to welding, a cutting wheel can be used to make the necessary cuts. Cutting wheels are a type of abrasive wheel that can be used to cut through metal. These wheels are available in a variety of sizes and can be used with a handheld grinder or a stationary chop saw. It is important to choose the right cutting wheel for the job, as using the wrong wheel can result in poor cuts or even injury. Cutting wheels should be used with proper PPE, including eye protection, gloves, and a face shield.
Step 4: Grind the Edges
After the metal has been cut, it is important to grind the edges to ensure that they are smooth and free of any burrs or sharp edges. This can be done using a grinding wheel or a flap disc. Grinding the edges will not only improve the appearance of the cut but will also ensure that there are no sharp edges that could cause injury or damage to the weld.
Step 5: Clean Again
Once the metal has been cut and ground, it is important to clean the surface once again using a solvent such as acetone or alcohol. This will help to remove any debris or contaminants that may have been generated during the cutting and grinding process. It is important to ensure that the surface is completely clean before welding to avoid any potential issues.
Step 6: Tack Weld
Before beginning the final welding process, it is important to tack weld the metal pieces together. Tack welding involves making small welds at strategic points to hold the pieces together. This will help to ensure that the pieces are properly aligned and will make the final welding process easier and more successful.
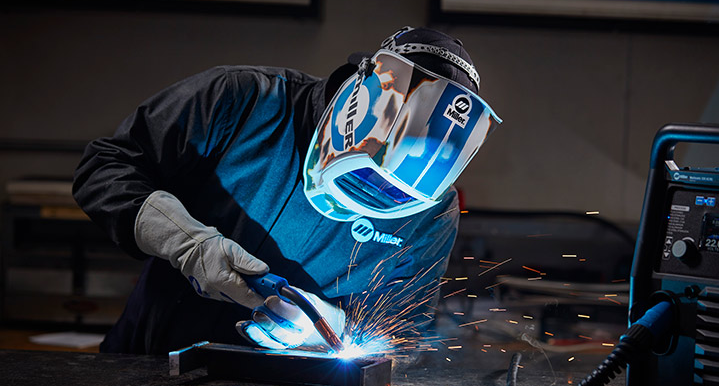
Step 7: Welding
The final step in the process is welding the metal pieces together. This can be done using a variety of welding techniques, including MIG, TIG, and stick welding. It is important to choose the right welding technique for the job and to follow proper safety procedu res throughout the welding process. This includes wearing proper PPE, properly grounding the welding equipment, and ensuring that the work area is well-ventilated.
Warm Tips
When using a cutting wheel, it is important to follow these guidelines:
- Choose the right wheel for the job:Cutting wheels come in various diameters, thicknesses, and profiles, and each has its advantages and disadvantages.
Thinner cut off wheels provide smoother, cleaner cut lines, reduce heat build-up in the cut, and minimize burr formation. However, they have less durability because they have less mass. Thicker cut off wheels provide durability and longer product life, but they cut slower and generate more heat due to increased contact with the work surface.
It’s crucial to consider the thickness of the material being cut and choose the proper product and tool diameter for the job. Using a 4.5-inch cut off wheel to cut materials that are over 3/8 inch thick is not efficient, as it reduces the number of cuts and the wheel’s life. Moving up to a 6-inch cut off wheel or larger wheel when cutting larger or thicker parts and materials can help tackle the job more efficiently.
The cutting wheel’s profile or type is also important. A Type 1 cutting wheel is flat and efficient for general-purpose cutting, while Type 27 depressed center (raised hub) wheels provide additional offset and are the best choice for flush cutting and rip cutting. Ultra thin cut off wheels are designed to provide minimum surface contact and maximum cut speed, making them ideal for cutting thinner gauge material, plunge cutting, finishing, and repair.
- Inspect the wheel: Before using a cutting wheel, it is important to inspect it for any damage or defects. A damaged wheel can shatter during use, causing serious injury.
- Secure the workpiece:The workpiece should be securely clamped or held in place to prevent it from moving during the cutting process.
- Use proper technique:When using a cutting wheel, it is important to keep a steady hand and use proper technique. The wheel should be held at a 90-degree angle to the workpiece and should not be forced or pushed too hard.
- Allow the wheel to cool:Cutting wheels can become very hot during use, and it is important to allow them to cool down before touching them or handling them.
Conclusion
Prepping metal for welding is an important step in the welding process that should not be overlooked. Mastering the strategies for proper weld preparation and properly prepping the metal can greatly improve the quality of the weld and prevent issues such as porosity, cracking, and weld failure. The use of cutting wheels can be an effective way to cut metal prior to welding, but it is important to choose the right cutting wheel for the job and to follow proper safety procedures throughout the process. By following the steps outlined in this article, you can ensure that your metal is properly prepped and ready for welding.