
Sanding spindles might seem like a simple task, but achieving that perfect smoothness requires patience, technique, and the right tools. Whether you’re refinishing an old staircase or crafting intricate furniture pieces, mastering the art of sanding spindles is essential for achieving professional-quality results. In this comprehensive guide, we’ll delve into the techniques, tools, and tips necessary to sand spindles effectively.

Understanding Spindles:
Spindles, also known as balusters, are the vertical rods or columns that support staircases, handrails, and furniture. They come in various shapes, sizes, and materials, ranging from wood to metal. Sanding spindles can be challenging due to their intricate designs and often hard-to-reach areas.
Preparation:
Before diving into sanding, proper preparation is crucial. Start by removing any existing finishes or paints from the spindles using a suitable sandpaper or paint stripper. Ensure the surface is clean and free of debris to achieve optimal sanding results.
Tools and Materials:
Just as a painter wields brushes of different sizes and bristle types, a woodworker must arm themselves with an array of tools tailored for the task at hand. From sandpaper to flap wheels, each tool plays a crucial role in achieving the desired smoothness and finish. Understanding their nuances and applications is key to navigating the sanding process effectively.
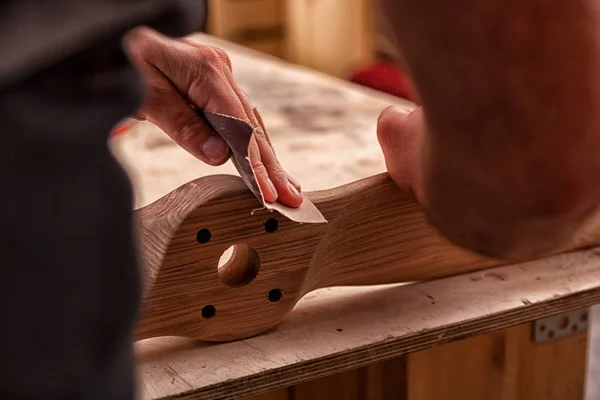
- Sandpaper:Opt for fine-grit sandpaper (typically 120 to 220 grit) to avoid leaving noticeable scratches on the spindle surface. For convenience, consider using sandpaper rolls, which can be torn into strips for wrapping around the spindle or folded to reach narrow areas.
- Sanding Blocks: Use sanding blocks to maintain consistent pressure and control while sanding intricate details. Foam sanding blocksare particularly useful for conforming to curved surfaces.
- Detail Sander: A detail sander with a triangular-shaped pad is ideal for reaching tight corners and edges. Look for models with variable speed settings and ergonomic grips for enhanced maneuverability.
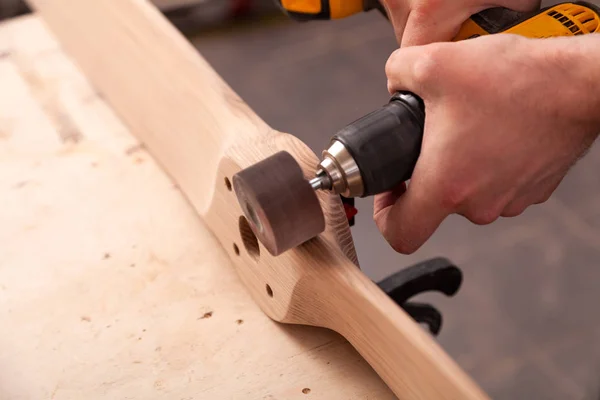
- Rotary Tool: For extremely detailed or hard-to-reach areas, a rotary tool with sanding attachments can be handy. Attachments such as sanding drums or abrasive buffs allow for precise sanding in confined spaces.
- Flap Wheels: Flap wheelsconsist of overlapping abrasive flaps mounted on a spindle, making them excellent for contour sanding. Choose flap wheels with varying grit sizes to accommodate different sanding stages and spindle profiles.
- Dust Mask and Safety Glasses:Protect yourself from inhaling dust particles and ensure eye safety throughout the sanding process. Disposable respirators with N95 filters offer effective dust protection, while safety glasses with side shields shield your eyes from debris.
- Workbench or Work Area: Set up a stable workbench or dedicated work area where you can securely position the spindles for sanding. Use clamps or bench vises to secure the spindles in place and prevent them from shifting during sanding.
Techniques:
With the tools assembled and the spindles prepared, it’s time to delve into the heart of the matter: the sanding techniques. Whether employing hand sanding, detail sanding, or utilizing flap wheels, each technique demands precision, patience, and attention to detail. Mastering these techniques is akin to honing the strokes of a skilled artist, each pass refining the surface closer to perfection.
- Hand Sanding:Begin by hand sanding the spindles using fine-grit sandpaper. Wrap the sandpaper around a sanding block or foam pad to maintain even pressure and smooth out any imperfections. Work along the grain of the wood for optimal results, applying light to moderate pressure.
- Detail Sanding:For intricate designs or hard-to-reach areas, switch to a detail sander or rotary tool with sanding attachments. Use the appropriate sanding tip or attachment to access tight corners, curves, and crevices while maintaining control and precision.
- Flap Wheel Sanding:Utilize flap wheels for contour sanding, especially on curved or irregular surfaces of the spindles. Choose flap wheels with a diameter and grit size suitable for the spindle profile, ensuring efficient material removal and surface blending.
- Use Proper Pressure:Apply gentle yet consistent pressure while sanding to avoid uneven surfaces or excessive material removal. Let the sandpaper and flap wheels do the work, and avoid pressing too hard, especially on delicate wooden spindles. Adjust the pressure as needed to achieve the desired level of smoothness and surface refinement.
- Inspect Regularly: Periodically inspect the sanded surface to ensure uniformity and smoothness. Run your hand over the spindle to detect any remaining imperfections or rough spots. Use a bright, angled light source to reveal any scratches or blemishes that may require further sanding.
- Repeat as Needed: Depending on the condition of the spindles and desired smoothness, you may need to repeat the sanding process with progressively finer grits of sandpaperand flap wheels. Gradually transition from coarser to finer abrasives to refine the surface texture and remove any remaining scratches or marks.
Finishing Touches:
Once you’ve completed sanding, the spindles are ready for finishing touches. Depending on your preference and the intended use of the spindles, you can apply wood stain, paint, or clear coat to enhance their appearance and protect the surface from wear and tear. Allow sufficient drying time between coats and follow the manufacturer’s instructions for best results.
Conclusion:
Sanding spindles requires precision, patience, and the right tools. By following proper techniques and using quality materials, you can achieve smooth, professional-looking results that enhance the beauty and durability of your staircases, furniture, or other projects. Remember to prioritize safety and take your time to ensure each spindle receives the attention it deserves. With practice and dedication, mastering the art of sanding spindles will become a rewarding skill in your woodworking repertoire. Whether you’re a seasoned craftsman or a DIY enthusiast, applying these techniques will elevate your woodworking projects to new heights of excellence.