
As a homeowner or a DIY enthusiast, you might have encountered pipe thread corrosion at some point. Corrosion can cause significant damage to pipes, leading to leaks, reduced water pressure, and even total pipe failure. The good news is that you can remove pipe thread corrosion and restore your pipes to their original condition. In this article, we’ll guide you through the process of removing pipe thread corrosion and discuss the tools you’ll need.
Understanding Pipe Thread Corrosion
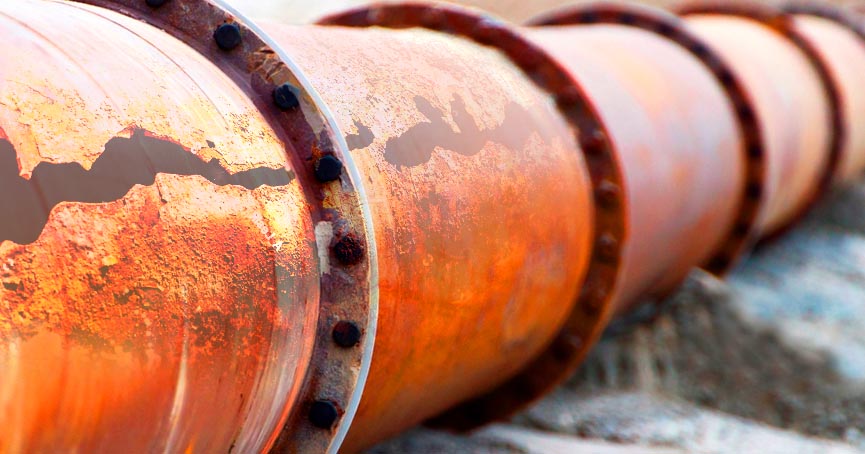
Pipe thread corrosion happens when the metal threads on your pipes come into contact with water, chemicals, or other elements that cause corrosion. This corrosion can manifest in the form of rust, scaling, or mineral buildup. Over time, the corrosion can become severe, leading to pipe leaks or damage.
There are several reasons why pipe thread corrosion occurs, including:
- Exposure to moisture: Moisture can cause the metal to rust or corrode, leading to thread damage.
- Chemicals: Exposure to chemicals, such as cleaning agents, can corrode the metal threads.
- High pH levels: If your water supply has a high pH level, it can cause the metal threads to corrode quickly.
- Temperature: High temperatures can accelerate corrosion on metal pipes.
If you notice signs of corrosion on your pipes, such as leaks or low water pressure, it’s essential to address the issue promptly to prevent further damage. Removing pipe thread corrosion involves several steps, and you’ll need specific tools to get the job done.
Tools Required
Before you get started, you’ll need to gather a few tools to make the process easier. Here are the tools you’ll need to remove pipe thread corrosion:
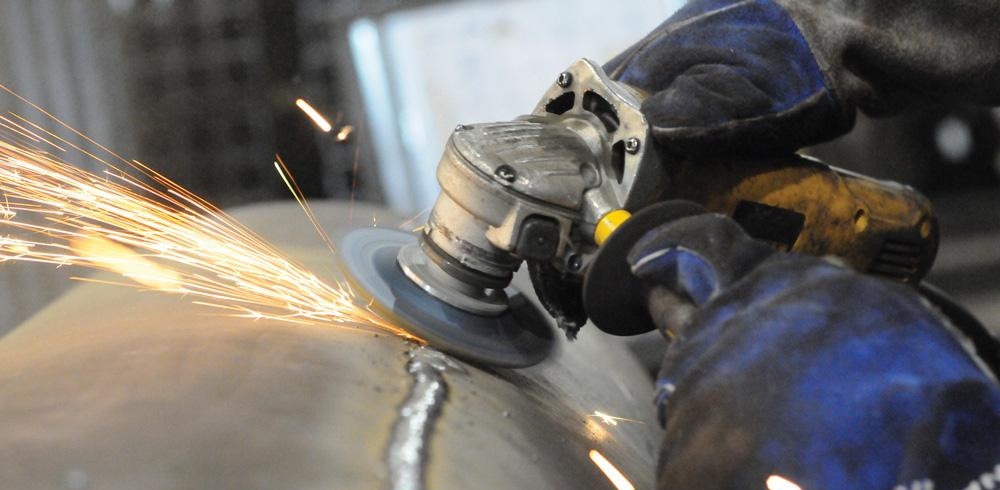
- Flap disc: A flap disc is an abrasive tool that attaches to an angle grinder. It’s used to remove surface rust and other types of corrosion from metal surfaces.
- Grinding wheel: A grinding wheel is a tool that attaches to an angle grinder and is used to smooth out rough spots and remove large sections of corrosion.
- Wire brush: A wire brush is a handheld tool used to remove surface rust and scale from metal surfaces.
- Chemical rust remover: A chemical rust remover is a solution that dissolves rust and other types of corrosion.
- Safety gear: When using any of the tools mentioned above, it’s important to wear safety gear, including eye protection, gloves, and a respirator.
Step-by-Step Guide to Removing Pipe Thread Corrosion
Now that you have all the tools you need, it’s time to get started. Here’s a step-by-step guide on how to remove pipe thread corrosion:
Step 1: Turn off the Water Supply
Before you start working on the pipes, turn off the water supply to prevent any leaks or water damage.
Step 2: Remove the Damaged Thread
If the corrosion is severe, you may need to remove the damaged thread entirely. To do this, use a pipe threader to cut a new thread on the pipe.
Step 3: Clean the Threads
Next, using a wire brush or using a flap disc to clean the threads. Use the wire brush to remove any loose rust or debris. If you’re using a flap disc, attach it to an angle grinder and use it to remove the corrosion from the threads. Be sure to wear eye protection and a respirator when using an angle grinder.
Step 4: Smooth Out Rough Spots
If there are any rough spots on the threads, use a grinding wheel to smooth them out. Attach the grinding wheel to an angle grinder and use it to grind down any rough spots on the threads.
Step 5: Apply Rust Remover
If there is still rust or other types of corrosion on the threads, apply a chemical rust remover to dissolve it. Follow the instructions on the product label and be sure to wear gloves and a respirator when handling chemical rust remover.
Step 6: Rinse the Threads
After applying the rust remover, rinse the threads thoroughly with water. Be sure to remove any residue left by the rust remover.
Step 7: Dry the Threads
Dry the threads using a clean cloth or a towel. Make sure that there is no moisture left on the threads, as this can cause corrosion to develop again.
Step 8: Apply Thread Sealant
To prevent future corrosion, apply thread sealant to the threads before reassembling the pipes. Thread sealant is a paste or liquid that seals the threads and prevents leaks.
Step 9: Reassemble the Pipes
Finally, reassemble the pipes and turn on the water supply. Check for leaks and make sure that the water pressure is normal.
Notice: It’s important to note that not all corrosion can be removed using the methods outlined above. If the corrosion is too severe, it may be necessary to replace the entire pipe. Additionally, it’s essential to inspect your pipes regularly for signs of corrosion and address any issues promptly to prevent further damage.
How to Maintain Your Piple?
Preventing piple thread corrosion is better than removing it, as it can save you time, money, and resources in the long run. Therefore, it is crucial to maintain the pipeline regularly by:
- Inspecting the pipeline for any signs of corrosion, leaks, or damages.
- Cleaning the pipeline regularly to remove debris, sediment, or chemical deposits.
- Flushing the pipeline with clean water or air to remove any trapped fluids or gases.
- Applying a corrosion inhibitor or cathodic protection system to the pipeline to reduce or prevent corrosion.
- Monitoring the pipeline’s performance and integrity using sensors, gauges, or other monitoring tools.
Conclusion
Removing pipe thread corrosion is an essential task that can help prevent further damage to your pipes. By following the steps above and using the right tools, you can remove corrosion and restore your pipes to their original condition. Remember to wear safety gear and take precautions when using chemical rust remover and power tools. With the right approach, you can keep your pipes in good condition for years to come.