
Renovating wooden surfaces often involves the meticulous process of removing old paint to reveal the natural beauty of the wood beneath. While this task can seem daunting, employing the right tools and techniques can significantly ease the burden. One such tool that stands out for its efficiency in paint removal is the wire wheel. This versatile attachment, when coupled with a power tool like a drill or grinder, can make the process more manageable and yield professional-quality results. In this comprehensive guide, we will delve into the intricacies of using a wire wheel for paint removal from wood, offering detailed step-by-step instructions and invaluable tips for achieving the best possible outcomes.
What You Need to Know about Wire Wheels?
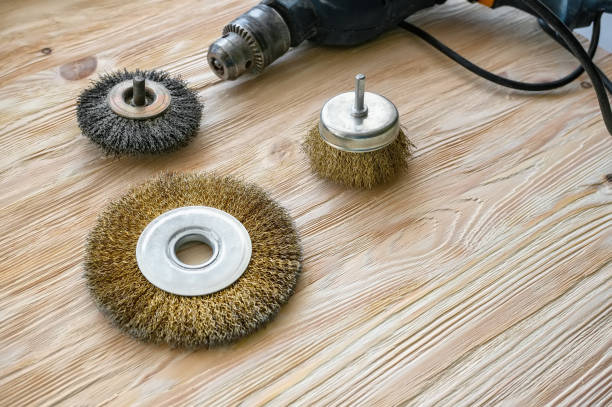
Before delving into the process of using wire wheels for paint removal, it is crucial to gain a solid understanding of these tools. Wire wheels consist of tightly wound wire bristles around a central hub, forming either a cylindrical or cup-shaped attachment. The wire bristles can be made of various materials such as steel, brass, or nylon, each serving different purposes in the paint removal process.
- Steel Wire Wheels:Ideal for heavy-duty paint removal tasks on robust wooden surfaces. These wheels are known for their durability and abrasiveness, making them effective for stripping away multiple layers of paint.
- Brass Wire Wheels:More suitable for softer wood or delicate finishes, brass wire wheels offer a gentler approach to paint removal. They are less abrasive than their steel counterparts, making them appropriate for projects where preservation of the wood is a priority.
- Nylon Wire Wheels: Best for light-duty tasks and delicate woods, nylon wire wheels provide a non-abrasive option for removing paint. They are particularly useful when dealing with intricate details or finishes that require a softer touch.
Choosing the right wire wheel depends on various factors, including the type of wood, the thickness of the paint, and the overall scope of the project.
Preparing the Work Area:
Before commencing with paint removal, it is essential to prepare the work area meticulously. Taking the time to set the stage properly can contribute to a smoother and more efficient process.
- Safety First:
Begin by prioritizing safety. Wear appropriate personal protective equipment, including safety glasses, gloves, and a dust mask. This ensures protection against flying debris and dust generated during the paint removal process.
- Ventilation:
Work in a well-ventilated area to minimize exposure to dust and fumes. If the project is conducted indoors, consider using a respirator or a dust extraction system to maintain air quality.
- Surface Inspection:
Inspect the wooden surface for any protruding nails, staples, or other hardware that might interfere with the wire wheel. Remove or secure these elements to prevent damage to the tool or the wood.
- Securing the Workpiece:
If possible, secure the wood piece in a stable position using clamps or a vice. This ensures stability and precision during the paint removal process, allowing for more controlled and accurate movements.
Choosing the Right Wire Wheel:
Selecting the appropriate wire wheel is a critical step in achieving successful paint removal. Consider the following factors when making this decision:
- Material of the Wood:
Different types of wood respond differently to abrasion. For softer woods like pine or cedar, opt for a brass or nylon wire wheel to prevent excessive damage. For hardwoods such as oak or mahogany, a steel wire wheel may be more effective in removing paint.
- Type of Paint:
The type and thickness of the paint layers influence the choice of wire wheel. Thicker or multiple layers of paint may require a more aggressive steel wire wheel, while thinner coats or delicate finishes may benefit from softer options like brass or nylon.
- Wheel Shape:
Consider the shape of the wire wheel based on the contours of the wooden surface. Cup-shaped wire wheels are ideal for flat surfaces, while cylindrical wheels work well on edges and corners. Choose the shape that complements the intricacies of your project.
Using the Wire Wheel:
With the appropriate wire wheel selected, it’s time to delve into the step-by-step process of using it to remove paint from wood. The following guidelines provide a comprehensive approach to achieving optimal results:
If using a drill or grinder, ensure the power tool is turned off before attaching the wire wheel. Follow the manufacturer’s instructions for securing the wheel in place, ensuring it is tightly fitted to the tool’s spindle.
- Adjust Speed and Pressure:
Proper adjustment of the power tool’s speed is essential. Lower speeds are generally suitable for softer woods and delicate finishes, while higher speeds can be used for harder woods and thicker paint layers. Additionally, apply gentle and even pressure to the tool, allowing the wire wheel to do the work without excessive force.
- Test in an Inconspicuous Area:
Before tackling the entire surface, perform a test in a small, inconspicuous area. This allows you to assess the effectiveness of the wire wheel and adjust your approach if necessary, preventing unintended damage to the wood.
- Work in Sections:
Divide the wooden surface into manageable sections to facilitate a systematic approach. Working in sections ensures even paint removal and allows you to maintain control over the process. This is particularly crucial for larger projects to prevent fatigue and ensure consistent results.
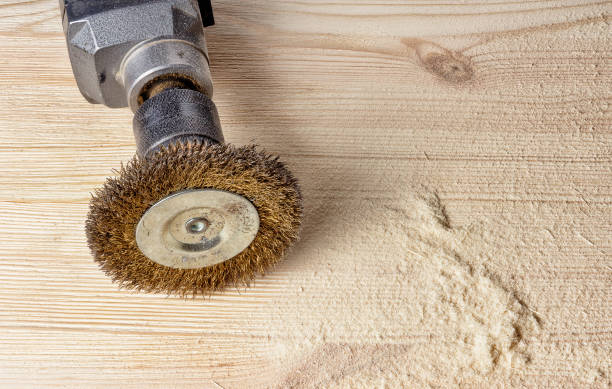
- Maintain a Consistent Angle:
Hold the power tool at a consistent angle, typically around 30 degrees to the wood surface. This angle provides optimal contact between the wire wheel and the paint, maximizing efficiency. Consistency in the angle of approach also contributes to uniform results across the entire surface.
- Address Corners and Edges:
For corners and edges, use a cylindrical wire wheel attachment or switch to a smaller wheel to reach tight spaces. Exercise caution to avoid gouging or over-removing paint in these areas, as the wire wheel’s high-speed rotation can be challenging to control in confined spaces.
- Clean the Wire Wheel Periodically:
Paint residue can accumulate on the wire wheel, reducing its effectiveness. Stop periodically to clean the wheel using a wire brush or similar tool. This ensures optimal performance throughout the paint removal process and prevents the build-up of debris that may scratch the wood.
- Inspect Progress Regularly:
Pause intermittently to inspect the progress of paint removal. Adjust your approach if necessary to prevent over-removal of paint and minimize the risk of damaging the wood. This step is essential for achieving the desired level of paint removal without compromising the integrity of the wooden surface.
Post-Paint Removal Care:
Once the paint has been successfully removed, there are additional steps to ensure the wood is ready for the next phase of your project. Proper post-paint removal care contributes to a polished and refined final result:
- Clean the Surface:
Use a soft brush or vacuum to remove any remaining paint residue and dust from the wood surface. A clean surface ensures better adhesion for subsequent finishes or treatments. Pay attention to details and crevices to ensure all debris is effectively removed.
- Sand the Wood:
Lightly sand the wood to smooth any rough spots left by the wire wheel. Use fine-grit sandpaper, moving in the direction of the wood grain to achieve a polished and even surface. Sanding helps prepare the wood for finishes and enhances its overall appearance.
- Apply a Finish or Sealant:
Depending on the intended outcome of your project, consider applying a finish or sealant to protect the wood and enhance its appearance. Choose a product that complements the type of wood and the desired aesthetic. Finishes can range from clear varnishes to wood stains, each offering unique benefits for preserving and showcasing the natural beauty of the wood.
- Dispose of Paint Debris Properly:
Collect and dispose of the paint debris in accordance with local regulations. Some paints may contain hazardous materials, so it is essential to follow proper disposal procedures to minimize environmental impact and ensure compliance with applicable laws.
Common Mistakes to Avoid:
While using a wire wheel for paint removal from wood can be a transformative process, it’s essential to be aware of common mistakes that may hinder your progress. By understanding and avoiding these pitfalls, you can ensure a smoother and more successful paint removal process without compromising the quality of your work.
- Inadequate Surface Inspection:
Overlooking a thorough inspection of the wood surface before starting the paint removal process can lead to unexpected challenges. Failing to identify and address imperfections or hidden hardware may result in damage to both the wood and the wire wheel.
Tip: Take the time to scrutinize the wood surface, checking for protruding nails, staples, or other hidden elements. Remove or secure any obstacles to ensure a smooth and damage-free paint removal process.
- Selecting the Wrong Wire Wheel Shape:
Choosing an ill-suited wire wheel shape for the specific contours of the wood surface can lead to inefficiencies and uneven paint removal. Neglecting to match the wheel shape to the intricacies of the project may result in missed spots and incomplete removal.
Tip: Assess the shape of the wooden surface and choose the appropriate wire wheel – cup-shaped for flat surfaces, cylindrical for edges, and corners. Matching the wheel shape to the project’s requirements ensures a more thorough and precise paint removal.
- Underestimating the Importance of Testing:
Proceeding with the paint removal process without conducting a test in an inconspicuous area is a common oversight. Failure to assess the wire wheel’s impact on the specific wood and paint combination may lead to unintended damage or ineffective results.
Tip: Always perform a test in a small, hidden area to gauge the effectiveness of the wire wheel. Adjust your approach based on the test results to ensure a successful and controlled paint removal process.
- Ignoring Power Tool Speed and Pressure Adjustment:
Neglecting to adjust the speed and pressure of the power tool according to the wood type and paint thickness can result in uneven removal, excessive wear on the wire wheel, or damage to the wood surface.
Tip: Follow manufacturer guidelines for adjusting the tool’s speed and start with lower settings, gradually increasing as needed. Apply even pressure to achieve optimal paint removal without compromising the integrity of the wood.
- Disregarding Corners and Edges:
Overlooking corners and edges during the paint removal process may leave remnants of paint behind, affecting the overall finish. Using the wrong wire wheel or applying too much pressure in these areas can lead to damage.
Tip: Pay special attention to corners and edges by using a suitable wire wheel attachment. Exercise caution to prevent over-removal or damage to these more delicate sections, ensuring a uniform finish across the entire wood surface.
Conclusion:
Mastering the art of paint removal from wood using a wire wheel is a rewarding endeavor that transforms worn-out surfaces into showcases of natural beauty. By understanding the nuances of wire wheels, meticulously preparing the work area, and following a systematic approach, you can achieve professional-quality results. Remember to prioritize safety throughout the process, choose the right wire wheel for the job, and invest time in caring for the wood post-paint removal. With these comprehensive guidelines at your disposal, you’ll be well-equipped to tackle any paint-stripping project with confidence and precision, unveiling the true potential of your wooden surfaces.